Online:Tower of Lies
|
||||
|---|---|---|---|---|
| Quest Hub | ||||
| Discoverable | Yes | |||
| Completion | Objective | |||
| Skyshards | 1 | |||
| Occupants | ||||
| (Quest-related): Ifriz the Unraveler, Overseer Aruz Ogrim, Watcher |
||||
| Zone | ||||
| Shrouded Plain, Coldharbour | ||||
| Location | ||||
| Northwest of the Hollow City | ||||
| Crafting Stations | ||||
|
||||
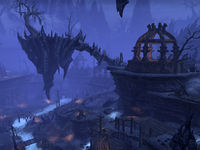
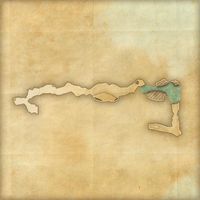
The Tower of Lies is a mine in central Coldharbour, northwest of the Hollow City.
Contrary to the name, the Tower of Lies is actually a deep pit in the ground. The name is attributed to a joke on Molag Bal's part. The mine is run by Ifriz the Unraveler, a Dremora mage hiding himself behind illusions at the top of the pit, guarding one of the Lights of Meridia.
Following the allied forces' invasion of Coldharbour, a contingent of Fighters Guild members were captured shortly after and brought here. Prisoners can be seen working the rocks in the pit, being closely watched by brutal ogrim.
Related Quests[edit]
- Tower of Lies Objective: Rescue the Fighters Guild members from the Tower of Lies. / You freed the Fighters Guild and gained a Light of Meridia.
- Truth, Lies, and Prisoners: Jump into a deep pit and help rescue the prisoners there.
People[edit]
|
Layout[edit]
The Cliffs Above the Tower of Lies[edit]
A river of Azure Plasm flows down into the Tower from the Hollow City to the southeast. If you follow the eastern riverbank north from the city, you may find a chest spawned in a cradle of jagged rocks near where the plasm falls begin.
Lowest Level[edit]
When you jump down into the pit, you'll land in a lake of Azure Plasm on the northeast side of the complex. The closest thing to your location is a boat near a dock, which is beside a foul water fishing hole. Bizurr inspects cargo and kicks the dirt near the dock, where the corpse of a harpy lays. Immediately north of the dock, you'll come across a cave with two Prisoners and a dead harpy inside. There's a heavy crate loaded onto a minecart in this cave. Skordo the Knife lies along the path leading west of the docks. The local skyshard lies in the lake, at the base of the plasm falls along the southern wall of the pit.
If you head further west, you'll find another fishing hole at a camp full of prisoners. One prisoner lays injured in a shack on the nearby dock, near Lyranth the Dremora. Another relaxes on a bed of furs. Fronjolf pretends to eat fried guar and drink mead near a tent, where one Prisoner tends to a sleeping comrade. A single ogrim looks over the river southwest of Fronjolf's camp. Heading south across the bridge will bring you to a quarry patrolled by ogrim. One of the ogrim patrols the riverbank just west of the bridge. Two prisoners hammer on wood, dig holes and break rocks, and another wanders this side of the lake. One of the ogrim guards is digging through trash in front of a cave across from the bridge. Galfinar is kneeling beside an unnamed corpse, which a nearby prisoner prays over. Borgath the Axe lies dead in the back of the cave, beside a cage and some stocks.
If you head west of this cave, you'll pass by a shed and find yourself at a minor crossroad. Straight ahead, you'll find a heavy crate among several boxes. A cave full of cages and torture devices that is guarded by an ogrim lies beyond that heavy crate. Sinfay is located inside this cave during the quest. You can also find a runestone left of the entrance and a water skin in the hand of a skeleton that's slumped over by the left wall. A bridge patrolled by an ogrim lies north of this cave. You can also opt to head south from the mouth of the aforementioned cave, up a wooden ramp. You'll find Overseer Aruz's Chamber at the top of the hill. If you head further south, you'll find another prisoner mining up on a ledge.
If you continue west down the hill at the crossroads, you'll find three ogrim beside the river. One of these ogrim watches over a prisoner who's fiddling with a cart loaded with rocks. A heavy sack can spawn beside this cart. Another ogrim always looks out over the river on the north side of this shore, and the third walks back and forth between the river and the base of the slope leading back up the hill. Four prisoners chip away at and dig at the base of a large boulder on the west side of this patch of land.
The plasm river ends at the western wall of the pit. Here, you'll find a tunnel guarded by two ogrim. A friendly Golden Saint and Dark Seducer are trapped inside. A prisoner chips away at a boulder along the shore northeast of this cage. If you head up the path moving east, you'll come across another camp. One prisoner lies on their back beneath a lean-to, and another looks out over the river from beneath a wooden shelter. Continuing southeast leads you to another crossroads; continuing east leads you back to Lyranth. South, you'll see the bridge guarded by an ogrim that was mentioned earlier. Along the northeastern cliff, you'll find a cave full of torture devices, which is guarded by two more ogrim. A single corpse lies on the floor of the cave. A single corpse lies on the floor of the cave. Vikord Skullcleaver is chained up inside this cave during the related quest.
If you head northeast from the camp with the two prisoners in it, you'll find a shack with a water sack in it to your right as you walk the path. Most importantly, you'll come across Liar's Passage.
Overseer Aruz's Chamber[edit]
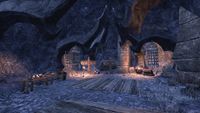
Overseer Aruz's Chamber is a small, yet open cavern containing torture devices and the overseer himself. You'll come here to kill the overseer during the related quest. There's a table along the wall on the left-hand side, which has a skeleton and some knives sitting on it.
Liar's Passage[edit]
Liar's Passage takes you to the Tower's upper levels. There's not much of note in here.
Two ogrim guard the path leading north after you turn the first corner. Another ogrim rummages through a crate on the north side of the portion of the cave that's partially flooded with plasm. One ogrim guards the path leading west. And another rummages through a crate just ahead. Two prisoners dig in the next large room, and two ogrim guard the way out.
One ogrim watches over a prisoner who's mining ahead. A final ogrim guards the top of the hill, and another prisoner digs in the wall just west of the exit.
Upper Levels[edit]
Outside Liar's Passage[edit]
Once you exit the passage, you may find a mushroom node to your left. There's a Daedric pavilion up ahead with a watcher standing vigil. Goblin slaves chip away at rocks to the north. An ogrim stands over a Goblin's corpse near the group, intimidating a cowering slave. A Watcher stands watch by the northern wall. Another pavilion lies east of the Goblin slaves; the path leading towards it is patrolled by another ogrim.
East of the Passage[edit]
You pass beneath the wooden structure while heading towards this eastern pavilion. If you look to your right after crossing beneath the threshold, you'll see an ogrim digging through some garbage. There's one watcher on the aforementioned pavilion. Another watcher is guarding a cave at the northern end of the path. There's an ogrim and a blacksmithing ore node spawn point in the back of this cave, as well as a few cages. A runestone spawn lies near the back wall, and a heavy crate lies beneath an open cage by the right wall. The Shrouded Plains Wayshrine lies beyond the northern wall, but it's inaccessible from within the tower.
If you head east past the pavilion mentioned earlier, you'll find another Daedric ruin down the path. A watcher stands guard off to the left of the path, and an ogrim stands in the middle of the road between the ruin and another cave, which is guarded by two more ogrim. The pavilion at the bottom of the hill is also inhabited by a watcher. An ogrim stands in the middle of the guarded cave, and there's a heavy crate to the right of a table in the back.
Captain Arakh's Camp[edit]
If you head east of the cave, you'll find a hill with a camp atop it. The camp is inhabited by Captain Arakh and a few prisoners. It is protected by Camp Defenders, who will fight any ogrim that venture near. There are two tents at the cave-side portion of the camp. Only one can be entered; it has a campfire in front of it and a backpack inside it. Captain Arakh's tent lies along the cliff off to the right. There's a heavy crate in front of her tent. A wooden ramp further east leads up to another section of the camp. A heavy crate is located beside a sleeping prisoner in the tent at the top of the hill. If you look south of this tent, you'll see a watcher by the cliff and a set of stairs leading to more Daedric ruins. There's an intact pavilion (which Ifriz the Unraveler inhabits during the related quest) and the warded path to the exit portal. A watcher stands guard on the section of hill east of Ifriz's pavilion. If you continue around the perimeter of the cliffs, you'll find a wooden ramp leading down. A watcher looks over the cliffs overlooking the place you landed when you jumped into the Azure Plasm lake.
Southern Cliffs[edit]
By now, you've reached the scaffolding above Skordo's initial location. If you look down at the docks, you'll see a harpy perched atop a pulley. As you head down, you'll see a watcher looking over the lower section of the pit, and a prisoner digging by the cliff face. Another watcher keeps an eye on the western end of the path. A prisoner kneels at the bend in the road, which leads to a rock bridge that loops back around to the two pavilions east of the passage. There's a cave on the right, just off the end of the bridge. It's full of cages and implements of torture.
West of Liar's Passage[edit]
Lyranth stands on the left side of the path to southeast of the Liar's Passage. There's a camp full of enslaved lamias ahead of her and off to the left of the path. A journal can be found on the ground by the campfire, opposite a waterskin. The lamias on the eastern cliff are feasting on hagraven corpses.
Captain Eilram's Camp[edit]
Captain Eilram resides within the camp at the top of the hill south of the lamia's camp. One prisoner kneels at the edge of the cliff, while another walks back and forth between their comrade and the nearby bar. A backpack and a heavy crate lie to the right of the tarp behind the aforementioned bar. An ogrim stands watch over the camp, standing upon a pavilion to the east. The large striped tent on the southwest side of the camp contains a praying prisoner, several cots, a rat, weapon and armor racks, a cooking fire, and three backpacks. A copy of the lore book, Exegesis of Merid-Nunda can also be found beneath this large tent. A small target range lies down the hill south of this tent.
Southern Cliffs[edit]
The path ahead is patrolled by an ogrim. Another ogrim stands beside a cart at the base of the hill, two stand watch on the ledge overlooking the plasm lake from the south, and a fourth ogrim rummages through personal effects on a dining table beneath a tent that's behind the cliff Daedra. A backpack and Captain Eilram's sword lie under this tent as well. A prisoner breaks rocks in front of a blacksmithing ore node off to the right of the tent.
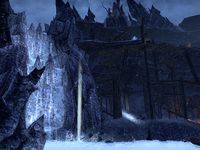
There's a small clearing down the path to the north. An ogrim walks up and down the hill, stopping to stand beside another ogrim who's overlooking the south side of the lake from the edge of a cliff. A prisoner is busy breaking rocks off to the right at the top of this path. If you head north down the wooden planks left of the cliff-watching ogrim, you'll traverse a platform that spans the cliffs leading up to the waterfall. There's a heavy crate beside a crane in the middle of the walkway.
Notes[edit]
- Unlike most locations, the location icon in the HUD compass doesn't go away while you are in the location area.
- Captive Guards used to reside here, but they were removed from the game.


